Limiting Magnitude
Limiting magnitude is the magnitude of the dimmest object that can be seen with a particular optical system be it unaided eye's binoculars or a telescope. Several factors can affect what the actual limiting magnitude will be.
Contents |
Theoretical Limiting Magnitude
All other factors equal, the limiting magnitude of an optical system is based solely on the aperture of the objective lens. This can be worked out with the following formula:

where d is the diameter of the objective lens/mirror of the optical system. This formula makes the assumption that the magnification used is greater than the diameter of the objective in mm, so telescope with a 70mm objective needs an eyepiece that gives at least 70x of magnification for this formula to be accurate. It also assumes clear and dark skies [1]
So for example, a dark adapted human eye with an aperture of about 7mm has a limiting magnitude of about 6.7 at a dark site. A 50mm set of binoculars has a limiting magnitude of 11.0 and a 127mm telescope has a limiting magnitude of about 13.0.
These magnitudes are limits for the human eye at the telescope, modern image sensors such as CCD's can push a telescope 4-6 magnitudes fainter[1].
Factors Affecting Limiting Magnitude
Now the theoretical limiting magnitude calculated with the formula above is the limiting magnitude under ideal conditions. As conditions are never ideal, the value may be less than that calculated. The atmosphere above the observing site has an effect. The closer to sea level a site is, the more atmosphere one has to look through and this has a negative effect on limiting magnitude. The weather has another effect, on how transparent the air is due to water and dust in the atmosphere. Turbulence causes stars to be smeared making them seem dimmer.
The telescope optics also have an effect on the limiting magnitude beyond the diameter of the objective. Poorly produced or aligned optics will spread the light of an object out and make it seem dimmer. Dirt and dust on the optics will also absorb and diffract light, again making the object seem dimmer than it really is. Higher magnification can, to a point, improve contrast by making the sky appear blacker. This works especially well on stars as their light doesn't get spread out as much under magnification as does that of extended objects.
The age and skill of the observer is also a factor. As we age, our pupils don't dilate as much as they did when we were younger, limiting how much light gets into our eye. This is less a factor with a telescope as carefully selected telescope-eyepiece combinations can compensate for this somewhat but still something to consider. Further skilled observers can generally see dimmer objects than novice observers once they learn and master techniques such as averted vision.
Finally the sky itself has a magnitude. Even at the darkest site, there is a faint glow to the sky called air glow caused by starlight being scattered by the atmosphere. Other natural phenomenon such as the Zodiacal light and aurora also cause the sky to be less dark than it could be. Beyond natural phenomenon, the light pollution from city lights causes an incredible degradation to the brightness of the night sky. Human light pollution can push limiting magnitudes to values around 4 or higher, so only the brightest stars can be seen with the unaided eye. Binoculars and telescopes also see a corresponding reduction in their limiting magnitues such that 50mm binoculars can only see around magnitude 7 or so and a 127mm telescope is limited to around 10th magnitude.
Determining Limiting Magnitude
First determine if you're using your unaided eye, binoculars or telescope. You will then need to download the appropriate map from here. If you have a postscript printer, download the .ps postscript files as they will print cleaner than the .pdf files.
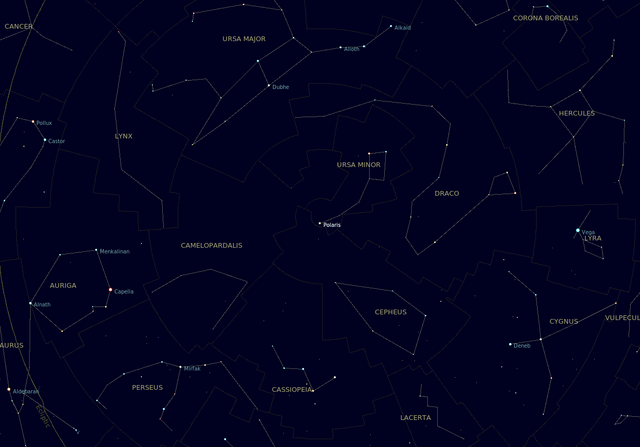
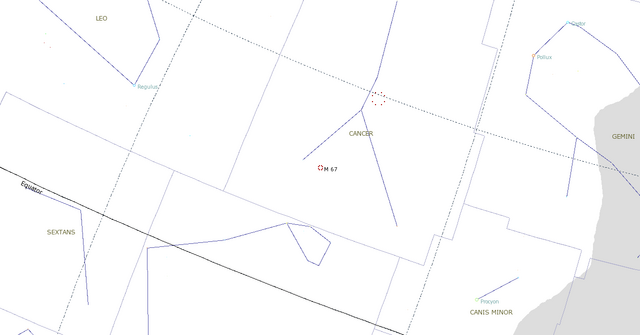
Once you have your file(s), on a dark moonless night go out into your back yard with a printout of the appropriate map and locate the appropriate object – Ursa Minor (Little Dipper) for the unaided eye, the "bowl" of Ursa minor for binoculars or M67 for a telescope.
Look at the object and circle the stars you see in the sky on the map. Use a red filtered flashlight if you need it to see the map. Once you've circled the stars you can see you can go indoors and work out your limiting magnitude.
Many of the stars on the map have numbers beside them. These numbers are the magnitudes of the stars they are beside, without decimal points. The decimal points have been omitted so they don't confuse you by looking like stars. This means that a star that is magnitude 5.3 is marked as 53, 10.2 as 102 and so on. Just assume there's a decimal point before the last digit.
Find the three stars you saw with the largest numbers. These will be the dimmest ones you saw. The average of these three stars will give you a good idea what your limiting magnitude will be.
Maps
Limiting Magnitude Maps
The limiting magnitude maps are .pdf and .ps files. They are held in the file repository on the blog evilscientist.ca. The links below provide access to the files:
| File | File Type | Contents |
|---|---|---|
| umivis.pdf | Naked eye map in PDF format | |
| umvis.ps | PS | Naked eye map in postscript format |
| umibino.pdf | Binocular map in PDF format | |
| umibino.ps | PS | Binocular map in postscript format |
| M67lim.pdf | Telescope map in PDF format | |
| M67lim.ps | PS | Telescope map in postscript format |
Locator Maps
Here are locator maps for Ursa Minor and M67
Ursa Minor
M67
Cite error:
<ref> tags exist, but no <references/> tag was found

